Gas Bayonet Fitting – Gas Bayonet Hose – Connect & Disconnect Gas Bayonet Heater
Bayonet Gas Fitting
A gas bayonet fitting (bayonet gas fitting) is used to connect a gas appliance, like a gas bayonet heater, to the gas bayonet wall socket (female gas bayonet fitting) or floor mounted female gas bayonet fitting (bayonet gas fitting) with a gas bayonet hose.
The gas bayonet hose connects the gas bayonet fitting (bayonet gas fitting) to the gas bayonet heater or other appliance via the gas bayonet wall socket (female gas bayonet fitting).
The gas bayonet fitting pair consists of a male and female gas bayonet fitting (bayonet gas fitting).
Gas bayonet installation (gas bayonet fitting) is like a bayonet light globe.
The most popular style of gas heater in Australia is the Portable Gas Bayonet Heater.
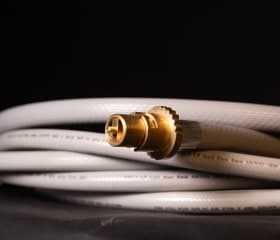
A portable gas bayonet heater connects to your home gas supply by means of a gas bayonet hose (bayonet gas hose) with a brass push & twist-to-lock gas bayonet fitting (bayonet gas fitting) for gas bayonet installation.
Gas Bayonet: Gas Bayonet Heater, Gas Bayonet Fitting, Gas Bayonet Hose & Gas Bayonet Wall Socket
 A gas bayonet or gas bayonet fitting (bayonet gas fitting) provides a method of attaching a gas bayonet heater to a gas bayonet wall socket (female gas bayonet fitting) with a gas bayonet hose (gas bayonet fitting). All are part of the gas bayonet system of gas bayonet fitting components.
A male gas bayonet fitting (bayonet gas fitting) connects a gas appliance — typically a gas bayonet heater — to a fixed gas bayonet wall socket (female gas bayonet fitting) or floor mounted female gas bayonet fitting, attached to the gas supply, via a gas bayonet hose (bayonet gas hose).
The male gas bayonet fitting is attached to the end of the gas bayonet hose (bayonet gas hose).
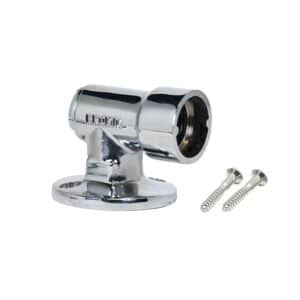
The female gas bayonet fitting (bayonet gas fitting) is attached to the gas supply line and affixed to a floor gas bayonet fitting or gas bayonet wall socket (female gas bayonet fitting).
You connect a gas bayonet hose (gas bayonet fitting) by pushing in and twisting clockwise to lock it in place.
To disconnect a gas bayonet hose (bayonet gas hose), you push in slightly, turn anti-clockwise and then pull the male gas bayonet fitting (bayonet gas fitting) out.
Read more for additional information and an important money saving tip…
Gas Bayonet Fitting (bayonet gas fitting) for LPG & Natural Gas Heaters – Gas Bayonet Installation
 Gas bayonet fitting (bayonet gas fitting) for a gas bayonet heater connect the gas bayonet hose (bayonet gas hose) to the gas source.
They include gas bayonet hose (bayonet gas hose) with the male gas bayonet fitting assembly that plugs into the female gas bayonet fitting (bayonet gas fitting) incorporated into the gas bayonet wall socket. (see image)
The gas bayonet installation includes the female gas bayonet fitting (bayonet gas fitting) connected by gas pipe fittings to the gas bottles or natural gas bayonet heater connections.
Female gas bayonet installation can be into a wall or through the floor
Most gas bayonet heater models have an electrical connection to power the fan, igniter and control board in addition to a gas bayonet hose (gas bayonet fitting).
Some models of radiant gas bayonet heater only require the gas bayonet hose (bayonet gas hose) and do not require electricity.
Female Gas Bayonet Wall Socket (bayonet gas fitting)
The gas bayonet wall socket (bayonet gas fitting) or floor socket (female gas bayonet fitting) is permanently attached to your wall or floor and the supply gas line is connected to it through the wall or floor.
Gas Bayonet Heater, Gas Bayonet Hose (bayonet gas hose) and Male Gas Bayonet Fitting
Inspect & Clean the Gas Bayonet Fitting (bayonet gas fitting)
Gas Bayonet Installation
A licensed gas fitter must always do the gas bayonet installation.
 The female gas bayonet fitting (gas bayonet wall socket) is installed through a wall or the floor and is connected to the gas bottle piping.
Hence, it involves significant plumbing work, which should only be performed by certified professionals.
The male gas bayonet installation is just a matter of attaching it to the end of a gas bayonet hose (bayonet gas hose), typically done by the gas bayonet hose manufacturer.
Various gas bayonet fitting (bayonet gas fitting) components may be required to properly connect the gas bayonet cooker or gas bayonet heater to the gas bayonet, including:
- Gas bayonet hose (bayonet gas hose)
- Gas bayonet wall socket (bayonet gas fitting): angled or straight in brass, chrome or stainless steel
- Gas bayonet floor socket (gas bayonet fitting)
- Mounting bracket
Show Me My Price
Connecting a Gas Bayonet Heater – Gas Bayonet Fitting
The actual physical act of connecting the two gas bayonet fitting (bayonet gas fitting) ends is very similar to the changing of a bayonet light globe.
Disconnecting a Gas Bayonet Heater – Gas Bayonet Hose (bayonet gas hose)
If You Continue to Smell Gas After You Disconnect the Gas Bayonet Hose – Gas Bayonet Heater
Money Saving Tip for Summer Storage of a Gas Bayonet Heater
25 Gas Bayonet Heater Safety Tips
 1. Always read you gas bayonet heater owner’s manual and follow the manufacturer’s directions for proper set-up and safe operation.
2. Fixed gas heaters and a gas bayonet (bayonet gas fitting) must be installed by licensed gas fitters in accordance with the local gas and electrical authority regulations.
Gas heaters should not be built in unless designed for that purpose.
3. Choose a gas bayonet heater that is appropriately sized for the room.
Please refer to manufacturer’s specifications prior to purchase or relocation of the gas bayonet heater.
4. Do not use the gas bayonet heater unless it has been certified for use by the Australian Gas Association or SAI Global.
Look for the attached label or badge when you purchase the gas bayonet heater.
5. If equipped with a filter, the gas bayonet heater filter should be regularly cleaned during heating season to maintain proper air flow.
 6. Keep children and pets away from a gas bayonet heater.
A one metre “Kid Free Zone” is a good idea.
Young children should always be supervised to ensure that they DO NOT play with the gas bayonet heater.
7. Do not permit children to adjust the gas bayonet heater controls or move the heater.
8. Turn a gas bayonet heater off when unattended and when you go to bed.
9. Never sit on a gas bayonet heater.
10. Do not cover or place articles on or in a gas bayonet heater.
11. Keep a gas bayonet heater at least one metre away from all flammable objects including furniture, drapes, books and boxes.
Windows covering that can be wind blown into the gas bayonet heater should be restrained.
12. Never use a gas bayonet heater to dry clothing, shoes or other articles.
13. Never place the gas bayonet heater where towels or other objects could fall on the heater and start a fire.
14.A gas bayonet heater should only be used in rooms with adequate ventilation.
Fixed ventilation must conform to local regulations.
15. Never use a portable gas bayonet heater in a bedroom, bathroom, toilet, sauna or any room used for sleeping.
Certain flued heaters may be used in bedrooms but check the manufacturer’s specifications before such use.
 16. Never use or store flammable liquids or aerosols near a gas bayonet heater.
17. A gas bayonet hose (bayonet gas hose) & power cords cannot be extended through a doorway into an adjacent room
18. Do not operate a gas bayonet heater where painting is being done or has recently taken place.
19. Most manufacturers suggest periodic inspection and service of the appliance and installation. Two years is the most common recommendation.
Please refer to your owner’s manual for more information.
20. Never attempt to disassemble or service the gas bayonet heater yourself.
Always use a qualified technician.
21. In the event that the gas bayonet hose (bayonet gas hose) or electrical connection should become damaged or the heater malfunctions in any way, do not operate until it is fixed by a qualified service person.
22. If you have a flued gas heater:
Be sure that you have it professionally installed by a gas fitter.
Regularly check the flue for unobstructed venting.
Be aware that insects, birds and animals can build nests in vent pipes.
If you suspect a problem, call a qualified gas fitter.
23. Do not use outdoor gas heaters indoors.
Outdoor gas heaters may create carbon monoxide.
Carbon monoxide can make you dizzy, give you headaches or flu-like symptoms. Extended exposure can be fatal
24. Never use a gas oven to heat your home.
25. If you smell gas at any time in your home:
• No flames or sparks
New Residential LPG customer?
New Business LPG customer?
Existing ELGAS customer?
- Butane – Butane Gas – Butane Chemical Formula- Butane Gas Canister - April 23, 2025
- BBQ – Gas and Charcoal BBQ Features – Charcoal BBQ vs Gas BBQ Comparison - March 31, 2025
- GPL Gas (GPL Fuel) – GLP Gas – LPG Gasul: GLP – GPL Station Near Me - March 26, 2025
Steve Reynolds
Technical Consultant
Steve Reynolds is a leading expert in the LPG industry with over 22 years of experience. As part of the national management team at ELGAS, Steve ensures the safe and efficient storage, handling, and transportation of LPG. He serves as the lead investigator for incidents and collaborates with authorities on industry developments.
Steve is a technical advisor to Standards Australia and Gas Energy Australia (GEA), and an active member of the World LPG Association (WLPGA), contributing to global standards and technical reviews. He holds a BSc. (Hons) in Industrial Chemistry from UNSW and has held senior safety and technical roles at ELGAS, making him a trusted authority in LPG safety and standards.


